
| It is best to create your safety pin at twice the size you actually want and then shrink it, to get rid of the jagged edges. I started with a canvas of 250x250, with a white background. | ||
 |
1. Create a path in an elongated oval. I connected two points (and back again, since paths have to be closed) so it just looked a line, and then added points to the middle of each line and pulled them out, pulling out the curve lines to make it rounder. | |
 |
2. Make a new path, and create a circular selection that follows the lines where it overlaps with the other path. I selected the other path while drawing the new one to be able to mesh with it correctly. | |
 |
3. Select the first path, and create a new layer. Choose black as your foreground colour, and go to Edit->Stroke. I chose a setting of 3 pixels wide, and centered. Depending on the size of your safety pin you may want to have it be a different width. | |
 |
4. Create a new layer, select the other path, and stroke this one with the same settings. | |
 |
5. This is what our layers look like when both visible. Next we need to change the way they are divided in two. Cut the large oval in half lengthwise, and put it in two separate layers. Use the same general line to cut the small circle in half, also in two separate layers. Merge a circle layer to an oval layer so it smoothly curves in, on both sides. When both layers are showing, it should still look like the picture on the left, but there will be a tiny bit of not quite solidness at the junctures of where you cut the lines. The only one that matters is the one in the circle at the bottom, so zoom in and fill in those few pixels with the pencil tool on one of the layers. | |
 |
6. Choose one of the layers to work with, hide the other one. Duplicate the layer, and select the first one (which should be below the new copy). Click on the Preserve Transparency box in the Layers menu. Put a grey (I used #666666) as the background colour, and press alt-delete (apple-delete on a mac). That layer should now have the same thing it did before, but in grey instead of black. | |
 |
7. Choose the upper layer, that is still black. Select the contents of the layer, and go to Filter->Blur->Gaussian Blur. I used a setting of 1. | |
 |
8. While you still have the selection active, go to Filter->Stylize->Emboss. I used an angle of 135 degrees, a height of 2, and 220% for the amount. | |
 |
9. Now use curves (Image->Adjust->Curves) to make it look more metallic and shiny. My curves for metal look something like this: Set the Layer Mode as Hard Light. You will now be able to see the colour of the layer under it through it (which is why we made it grey). | |
 |
10. Repeat the process for the other side. | |
 |
11. Add some definition to the difference in layers. Select the content in the layer that is behind, and then delect the content of the layer in above it from that selection. Create a new layer in between the two. Choose the paintbrush tool with a fairly small fuzzy brush, with black as your foreground colour. brush a little at the edges where the two meet, to give a bit of shadow between them. Lower the layer opacity to taste, I set mine was at 75%. | |
 |
12. In a new layer above everything else, make a selection with the selection tool (or make a new path if you prefer) like the one on the left. | |
 |
13. Select a section out of that to delete, to make it look like the closure of a safety pin. | |
 |
14. Duplicate the layer, and make the layer below grey as before. On the upper layer, select the layer content, then Filter->Blur->Gaussian Blur, but this time with a setting of 2. Don't deselect, and go to Filter->Stylize->Emboss. I upped the height to 4, but left the rest of settings the same. | |
 |
15. Apply Image->Adjust->Curves, with settings as before. Set the Layer Mode to Hard Light. | |
 |
16. Select the content of the layer, and create a new layer. With the paintbrush again, and a foreground colour of black, draw a shadow along the edge of one of the sides. I set the opacity of the layer at 64%. With the direction of shadow used here, I didn't have to add a shadow between the closure and the wires. | |
 |
17. Select the content of each layer, so your selection looks like an outline of your safety pin. Go to the Background layer, and create a new layer. Fill the selection in that layer with black. Deselect the layer, then go to Filter->Blur->Gaussian Blur, with a setting of two. Move the shadow 2 pixels down, and two pixels to the right. | |
 |
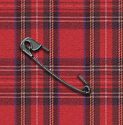 |
18. Shrink your image by 50% to get rid of the jagged edges created by the curves. You can cut out a piece of the pin with the polygon selection tool to have it go into something (the side of the closure without the shadow is the side that opens). You might wish to add a layer above everything with a little bit of shadow defintion at the edges (mine were a couple of pixels in black on each edge, with the opacity set down a little). |